How to reseal the front top timing cover
on the 1989 300E (W124/M103)
5/2/05
by Robert RyanOverview:
Is your 300e leaking oil? Chances are good that the oil is leaking from the front, top timing cover. This article describes how to diagnose this oil leak and how to fix it. This article is written for those with novice mechanical skills, such as those who know how to change their own oil or sparkplugs. The repair is fairly simple but can be tedious without the right tools and supplies. If you don't have access to the correct tools then you should purchase them or have somebody else do the repair. I just followed these instructions on another 300E and performed the repair in one hour and 15 minutes. I started the timer once I had all the tools ready and stopped once I started the car up to inspect for leaks. Add time to test drive and tidy up afterwards and you're probably looking at around two hours.
Warning
I accept no liability for injuries or damages caused by following these instructions. I am an amateur and work on cars only in my spare time.
Diagnosis:
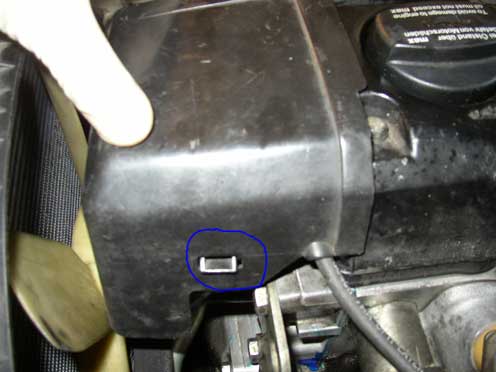
Oil coming from the front of the engine and dripping down onto the sway bar is the hallmark symptom. The source of the leak will look relatively glossy. This area typically leaks the most when decelerating or pointing downhill. This is because the oil flows over this area most in this situation. After driving the car remove the plastic housing that covers the distributor cap. Note the tab in the blue circle in the picture below. There is a tab on each side.
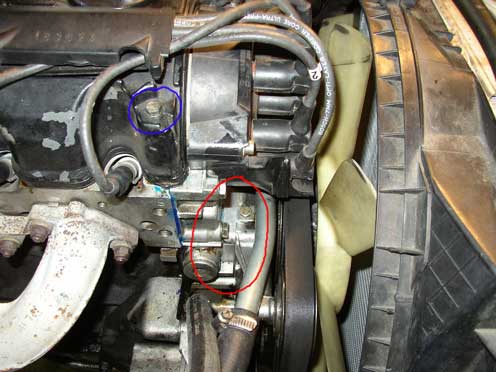
Once you have the housing removed stand on the right side of the car (the passenger side for US cars) with a bright light. Aim the light just below the distributor cap, as shown in the red circle in the picture below. If it looks or feels oily then it needs to be resealed. This picture was taken after the leak was fixed. Jump to Step 10 for instructions on how to replace the plastic housing.
You will need the following supplies:
- 2 rags (one must be clean and oil-free)
- 10mm socket
- 13mm socket
- ratchet
- 13mm wrench
- 5mm hex key (Allen wrench - see note below)
- 3mm hex key (Allen wrench - for removing rotor)
- slotted screwdriver (for cleaning away old sealant)
- residue free solvent, like brake cleaner or acetone
- T30 Torx bit (for removing rotor driver)
- A big socket or something to drive in the camshaft seal
- A new gasket
- A new camshaft seal
- Sealant (see note below)
- A piece of scrap aluminum for scraping away old sealant (Item A in the picture)
- A rubber mallet (get one, they're cheap)

And the gasket:

A note on the 5mm hex key wrench
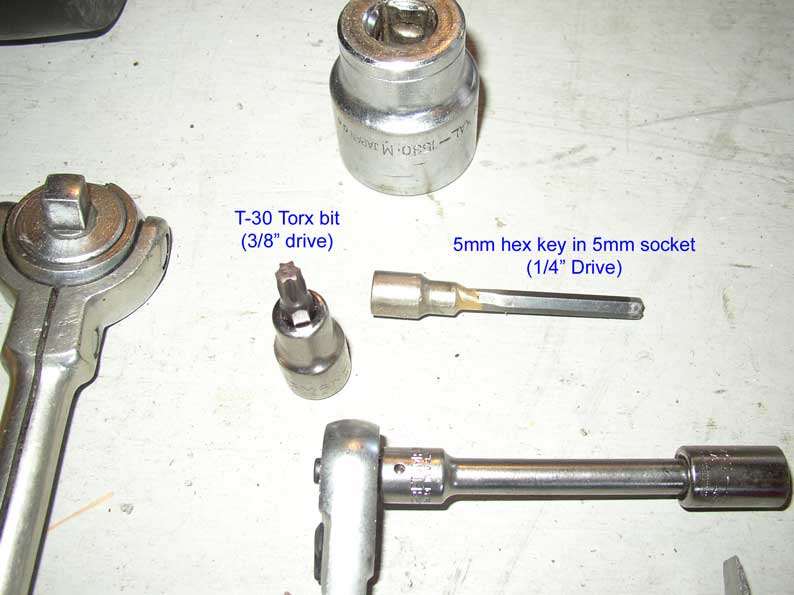
There are three 5mm Allen bolts that secure the distributor cap. The bottom one is tricky to remove, in fact it can be downright impossible without the correct wrench. I have found the ideal tool is to take a 5mm allen wrench (L-shaped) and use a dremel moto tool to cut off the short leg and the bend. Take the long piece and stick it into a 5mm socket. I have used this so much that I glued it in and keep it there permanently. You might stick some chewing gum into the socket to keep the allen wrench from falling out. In this photo there is also a 1/4" extension bar. The combination of these tools makes removing that bottom bolt simple.
A note on the sealant
I started a thread to get everyone's opinion on which sealant is the best . Opinions varied, from MB specified Loctite 5900 to "just about anything". Loctite 5900 is a type of RTV silicone (room temperature vulcanizing). I tried a Permatex RTV and found when I reinstalled the cover that I had pushed in the gasket and this resulted in a gushing leak. Some pro's use only a dab of oil on the gasket and are scoffing as they read this. I've also used Hylomar sealant and always had great results. I used this four times and never had a leak; one repair just finished its second year of service, so this time I am using the Hylomar. One of the nice things about Hylomar is that it can be put into service instantly. This is really nice since you can start the car up and inspect for leaks while you have all the tools out.
Step One: Loosen the 10mm bolts on the valve cover
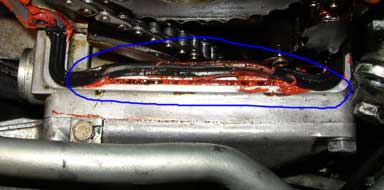
Now that you have the correct supplies the first step is to loosen up the valve cover (cylinder head cover). It is not necessary to remove it, it only needs to be loosened. This saves the time of removing the wires and some of the vacuum hoses. Take the 10mm socket and slacken all of the 10mm bolts on the head cover until they are completely free. These are shown in the blue circle in the second picture. Gently tap around on the cover with the mallet until it separates from the cylinder head. The manual cautions against striking the cover with a hammer. You should be able to lift the front edge of the head cover about 1/4". Do not use a screwdriver or anything else to pry up the head cover or else you'll mar the surfaces and end up with another oil leak. Use the rubber mallet and gently work it free.
Step Two: Remove the distributor cap
There is no need to unplug the wires from the cap. Remove the bottom bolt first. This is the most difficult one but it's a snap with a little tip and the right tool. The plastic fan is in the way. But the fan blades are not evenly spaced. Spin the fan around and you'll notice a spot where the blades are much farther apart, as shown in the picture below. This is your window to the bottom bolt.
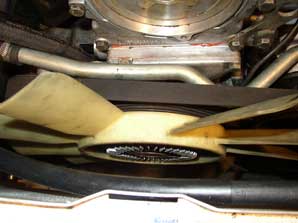
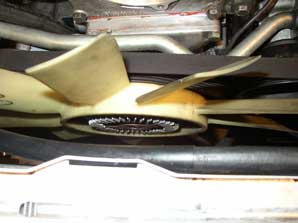
Stand on the left side of the car (driver's side for US cars) and shine a bright light under the distributor cap. The head of the bolt is shown in the red circle in the picture below.
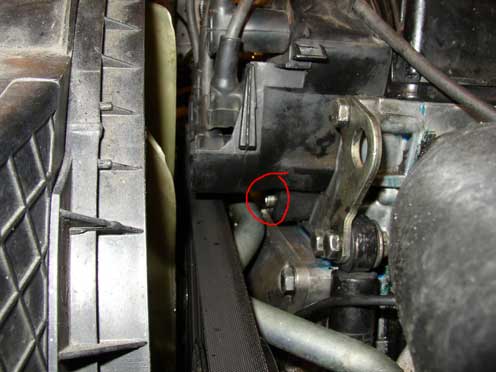
Use the allen wrench tool described earlier and attach it to a ratchet. A 1/4" drive ratchet works best but a 3/8" drive ratchet and a 1/4" adapter also work. Use the top of the belt as a guide to find the bolt. Once you get this bolt off remove the other two allen bolts on the top left and top right of the distributor cap. Wiggle the fan and play around with the distributor cap to free it up. Flip the cap over and rest it on the head cover.
Step Three: Remove the rotor and the rotor driver
Take the 3mm hex key (allen wrench) and use it to remove the rotor. Once the rotor is removed you'll find a single Torx bolt behind it. Use the T30 Torx bit on a ratchet to remove it. Once this bolt is removed you'll be able to pull out the bracket that the rotor gets bolted to. This is called the "rotor driver". Once the rotor driver is free you can take out the orange plastic disc.

Step Four: Remove the top timing cover
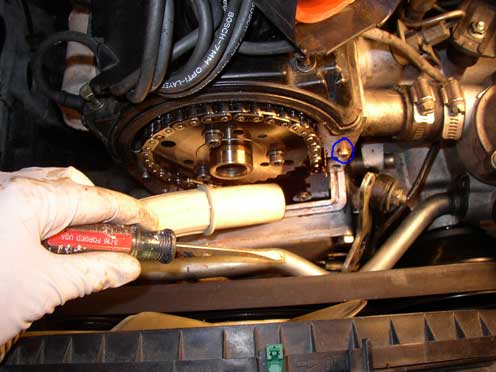
Loosen the four 13mm bolts that secure the top timing cover to the head, shown circled in blue in the picture above. You will not be able to completely remove one of the bottom bolts because there is a metal water tube in the way. Just be sure to completely loosen this bolt and it will come out with the top timing cover. Once you get the three bolts removed and the last one completely slackened, take the rubber mallet and tap gently on the back of the timing cover, on each side at the top, as shown in the red arrows in the picture above. Be gentle and patient and it'll eventually free up.
Step Five: Clean up the cover
Take the cover over to the bench and clean up the mating surfaces with some solvent. Take a big socket and tap out the cam seal. I had a scrap piece of aluminum to scrape away the old sealant. Don't use steel to scrape because it'll gouge the soft aluminum. Carburetor cleaner is pretty good at loosening old sealant up (wear nitrile gloves). Be patient and get the mating surfaces totally clean and free of old sealant. Pay attention to the corners. Use the clean rag with some solvent and wipe down the mating surfaces. Do not install the new cam seal, this is done after installing the cover.

Step Six: Clean up the head
Now that you've honed your skills with removing old sealant it's time to clean up the head. Jam a rag into the gap between the timing chain to keep debris out of the engine while doing the sides. I gently use the slotted screwdriver and a vacuum cleaner to work the old sealant out of the gap as shown below. A piece of wire from a coat hanger is helpful for the corners, but be gentle and no gouging. Make sure the channel and the corners are perfectly cleaned out. Give the mating surfaces a final wipe down with the clean rag and some solvent. Take the clean solvent rag and work it down into the channel with the slotted screwdriver. Be conservative with the solvent as it can dissolve the sealant used below where you are working, and removing the lower timing cover is a pain in the ass.
Step Seven: Apply the sealant
I prefer to use Hylomar and apply it to the rubber gasket and the mating surfaces. Some say this is unnecessary and only a dab of oil is needed on the gasket. The nice thing about Hylomar is that is viscous. The top timing cover must be slid into place as there are two pins sticking out of the head that enter the cover. The rubber gasket is laid into the channel and the cover is slid over it. So if the rubber gasket is dry it will bind up and get pushed in when the cover is slid into place. When I used RTV silicone it wasn't slippery enough and the gasket got dragged in a bit and caused a major leak.
- Using a shim or some material, wedge the black cylinder head cover up about a quarter inch. This allows the top timing cover to slide under it
- Take a look at the two pins that come out of the head, as shown in blue circle in the picture above. Notice how they slide into the cover.
- Sparingly apply sealant into the groove and corners (do not apply to the head)
- Press the rubber gasket into the groove
- Sparingly apply sealant on top of the gasket and in the corners
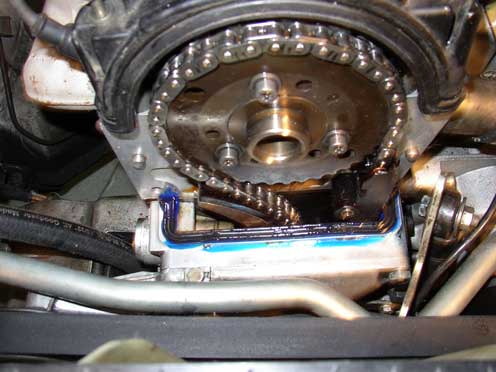
- Apply sealant to the mating surfaces on the cover only (if you apply it to the head you'll get it on the wrong places), see below.
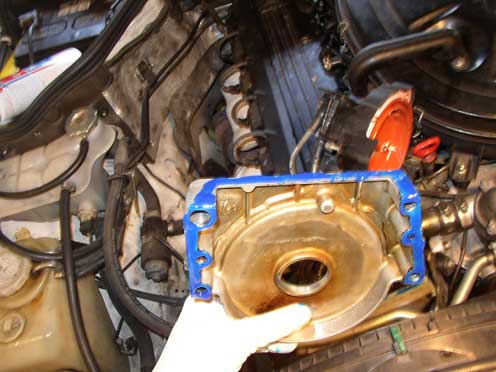
Step Eight: Replace the top timing cover
Place a 13mm bolt/washer in the timing cover where it won't clear the water tube back into the cover. You'll notice that two of the 13mm bolts have washers and the other two don't. The washers go on the left side as you are facing the timing cover. The bolts without the washers go through the steel bracket. This steel bracket is attached to a shock absorber that can be pushed down if necessary. This is the tricky part so the first time is for practice: Replace the cover by tilting the bottom edge in, pressing down to align the pins with the holes, and then tilting in the top while tucking it under the cylinder head cover/gasket. A plastic spatula (credit card) is helpful for prying up the cylinder head cover/gasket. Once you do this, pull the timing cover away and make sure the rubber gasket didn't get pushed out of place. This happened as shown below:
Press the gasket back into the groove and do it this time for real. Once you get the cover started over the pins get the two bottom bolts snug first, but not torqued. This will reduce the total amount of sliding over the gasket. If you forgot to put in the lower bolt and can't because of the metal tube then remove the 10mm bolt that secures the tube to the engine (this will give you enough wiggle room to get the 13mm bolt in, but don't wiggle it too much or it'll create a coolant leak). Then snug up the two top bolts and evenly torque all four bolts to about 21 NM (this is approximately a moderate tug on a 13mm wrench that is 6" long).
Step Nine: Tap in the camshaft seal
Place a dab of oil on the camshaft and a dab on the inside rim of the seal. Start the seal over the cam; it helps to use a thumbnail to get the rim of the seal over the cam. Be patient here and get the seal started correctly. The flat face of the seal should be facing you. Tap the seal into place using a big socket and the handle of the ratchet. Be sure to stop tapping when the seal is flush with the edge of the cover. It is possible to tap it in too far.
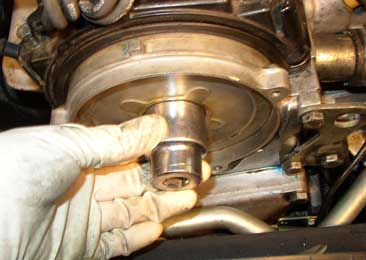
Step Ten: Wrap-up
- Gently tighten down the 10mm cylinder head cover bolts. Go gently and evenly, doing diagonal corners first and moving towards the center. You want to tighten them evenly so the cover does not get warped (these are very expensive to replace). 9 NM of torque is all that is necessary.
- Place the orange plastic disc back into its home, with the rubber seal facing out. The distributor cap, once installed, presses this disc up against the back of the top timing cover, so don't fret if it seems loose.
- Replace the rotor driver and the Torx bolt
- Replace the rotor
- Replace the distributor cap (wiggle it in, rotate the fan blade)
- Replace the plastic housing that goes over the cap and the wires. Note the rails on the head cover and the guides on the plastic housing in the picture below. These must align for the housing to slide back into place.
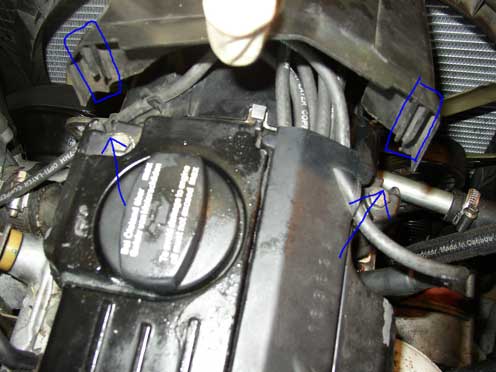
Start the car and let it warm up fully. Inspect for leaks, especially under the distributor cap.
CategoryDiy