Glow Plug Replacement
on the 1991 300D 2.5 (OM602)
by jbach36
1/21/09
People with the W123’s and other models say it’s easy to change glow plugs. On my car, a 1991 300d W124 602 engine, it is not easy. I’m assuming my plugs were the originals, 18 years old, so I think I went through every conceivable problem anyone could possibly have with the exception of a deteriorating wiring harness as a few people have, as noted at THIS LINK.
My problem started when I would turn the key, no glow plug light, but after the car started, the glow plug light came on. I thought that meant that the glow plugs were incorrectly still on after the car started, but turns out it means there’s a problem with the glow plugs, or wires, or relay, etc. I found that if just a few of your glow plugs work, the car will still manage to start, if none of them glow, the car won’t start.
Some older cars have an 80 amp fuse which they can check to see if that’s the problem. On my car, there is no fuse. It’s an automatically reset-able circuit breaker.
First, here’s Diesel Giant’s link on testing your wires and/or plugs. This is a very easy process. The hardest part of this, is getting the cap off your glow plug relay box. To do that, lift the front of the plastic cap (the part closest to the front of the car) towards you. It just clicks into and out of place. The front of the cap is shorter to make room for the wires coming into the box. Once the front is loose, push the back of the cap the same way, and twist the entire cap upwards towards the sky. It’s sort of a spooning motion.
If you want to see if the problem is within the realm of your glow plugs or relay, turn your key to the glow plug position. You should hear the relay clicking on and click again when it turns off about 20 or 30 seconds later. That should be indication enough that your relay is working. If you still suspect the relay, you can circumvent it by:
1) Get a set of five 12 gauge romex strands about 1 foot in length.
2) Strip all 10 ends.
3) Twist one end of all five together with pliers.
4) Remove the plug at the relay and insert one of the wires into each socket (one for each glow plug).
5) Connect a jumper cable from the twisted end to the positive battery terminal. (the black one doesn’t have to be connected to anything)
6) Wait 30 seconds.
7) Start the engine.
8) Remove jumper cable and temporary harness.
If the car starts fine, the plugs are getting power, but that the relay or its wiring is the problem.
Once you test as outlined in Diesel Giant’s link, now comes the hard part, changing the glow plugs. In a way, all you have to do, is get rid of stuff so you can get to the plugs. Take or draw pictures from the sides and overhead as you go, especially near the cruise control module, and the wiring harness near the glow plugs.
Disconnect the battery for safety. Take off the cruise control module and the intake manifold.
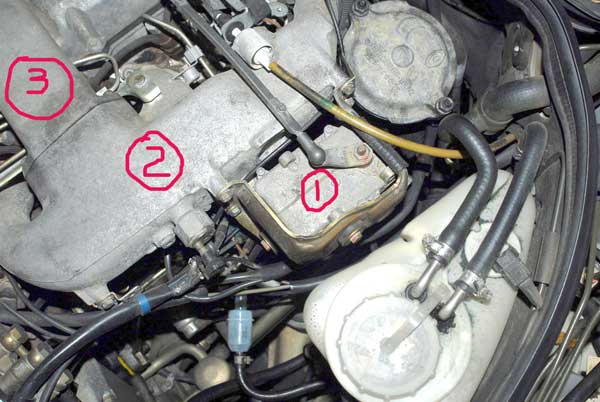
You’ll need a new intake manifold gasket and maybe even a new one where the manifold meets up with the turbo crossover tube (#3), though that one can probably be re-used, have one on hand just in case.
Take off all the clamps holding the fuel lines.
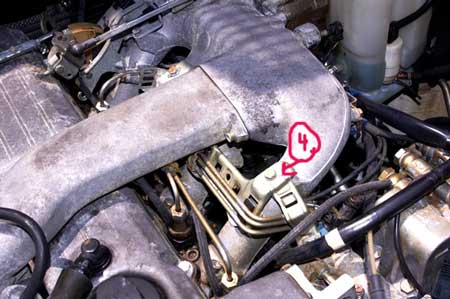
From memory, one or two are under the manifold and not so easy to see. Aside from the clamps, you’ll probably break some of the plastic fuel line clips if they’re not broken already, so get a whole set of those; they keep the fuel lines from clacking together and breaking. You don’t have to, but it will make your life easier if you can disconnect the throttle linkage that goes up/down. (Read further below)
To take the bolts off for the manifold, you can use a torx bit, but they really require an allen wrench. I lost several hours trying to get at them with my torx bit on a socket extension, plus my socket extensions were often too wide to get in. Later found out about THIS TOOL. Stuff a wrinkled up paper towel under the area to catch those when they’re loose, or use a magnetic tool so they don’t fall.
Once you get to the glow plugs, it takes a 10mm wrench to get the nuts off. On my model, the nut has a crimp to hold the washer onto it. Older models didn’t have this, so use a rag underneath to catch the washers. I had a problem on one nut, that when I turned it, the wire turned with it. I lost at 3 hours with this, they were nearly fused together. I tried holding the wire with pliers while turning the nut, that didn’t work. I tried separating the nut from the wire with a screwdriver, that didn’t work. I found out the real secret is jamming a screwdriver in, twisting it, and KEEPING the screwdriver there tightly, so the wire won’t turn. Then undo the nut.
Getting the glow plugs out was another thrill since they’re at an angle. Makes it really hard to get them out with most any tool. Socket extensions are either too short or too long, just enough to mess you up. You’ll need an arsenal of extensions, swivels, deep well and standard sockets. (Read further below).
Once the plugs are out, you should use a glow plug reamer ($30) to get rid of built up carbon. Put some grease into the fluted areas of the reamer to catch the carbon, putting the reamer in only by hand, do not force. Wipe off and do the same for the next glow plug. You can crank the car to blow out any excess carbon. I did not, and the car runs fine.
Definitely test all the glow plugs before putting them in!! You don’t want your car back together, only to find out one is bad and the car won’t start. See Diesel Giant’s article. The black jumper cable goes on the body of the plug, the red goes on the screw in area. Keep your hands off the plugs, they get very hot. When cool, use a bit of anti-seize lubricant on the threads of the plugs, and put them in, careful not to cross thread. I don’t know the proper torque on them, I went by feel.
Recheck the system using Diesel Giant’s link to make sure the wires and plugs test ok.
Assembly is WORSE than removal! I couldn’t get the manifold back in for all the wires, throttle cable, etc. in the way. I struggled for hours, finally had to hire someone to rescue me! The mechanic put it back in a few minutes, though he did remove the verticle throttle linkage (mentioned above) to make it easier. He did that by popping off two of the rounded knee connections on the vertical run of the throttle assembly (broke one by accident, but has a special epoxy plastic glue to repair it). He also used socket extensions that were thinner than mine, I guess ¼†socket drive, where I was using the 3/8. His socket swivels were a lot more agile than mine, so he got it together quickly.
He said the manifold should be torqued properly at each screw so it gets even pressure, ask others to see what torque, I don’t know. To put the manifold gasket on, it already has its own sealer on at the circles, so don’t use a gasket sealant. He put a few spots of "Super Weatherstrip Adhesive" on places other than the circles, to hold it in place while he put the manifold back on.
Once your parts are back on, the cruise control, etc., rehook the battery back up, and hopefully your glow plug light will come on.
In my case …. No glow plug light! Something was STILL wrong! And now the car wouldn’t even start, just cranked and cranked, meaning no glow plugs were working. Turns out one of my glow plug wires at the plug while tightening it, was turned such that it was touching the manifold, shorting it out, preventing all of the plugs from getting power. He adjusted the wire so it wasn’t touching the engine, and all was well.
GLOW PLUG HAPPINESS, AT LONG LAST.
Discuss this DIY here.
-jbach36
CategoryDiy